Clean Install of Windows 10 on a NVME m.2 Drive
It’s quick to install Windows 10, right?
My daily driver is a desktop that I originally built as a Hackintosh for my wife’s use. She outgrew it a year or so ago for a new iMac, and I inherited it. Over the year, I’ve been using macOS less and less, and have spent much more time on the dual-booted Windows 10 installation, especially since WSL is getting better and better all the time. It’s almost not painful to use for just about all the coding, writing, and occasional photography or design projects I undertake.
Two days ago, I noticed while doing some file cleanup that there really was a terrific lot of crap that had accumulated on the Windows drive. I’m fairly certain that this drive started out as a Windows 7 install, then probably skipped Windows 8 and has been on Windows 10 through several Insider Ring upgrades over the years. Anyway, I thought I’d just finish my backup and then re-install Windows to have a nice clean start. At the same time, I figured since I wasn’t really using the macOS installation that much, I’d move that one to a slower SATA SSD and move Windows over to the Western Digital 500GB NVMe M.2 drive that previously hosted the Hackintosh boot drive.
Based on my recollection of the last time I’d installed/updated Windows, it seemed like a reasonable afternoon project that should be pretty straightforward. As it turns out, the actual installation of Windows 10 is even quicker than I had remembered, but the getting to the point where installation was possible was more than I bargained for.
This is a write-up because I ran into a few problems that were difficult to find great answers for, and I’m sure there’s someone else out there who will get into a similar situation. That someone is most likely to be a future version of me…
Prepping for installation
Windows 10 install media
This is the easy part. I remembered having had issues in the past with the Windows Media Creation Tool, and so I went out of my way to download the plain old ISO.
Pro-tip: if you want to do this you need to spoof your User-Agent if you’re on Windows.
Pro-pro-tip: you probably don’t need to do this. I ended up using WMCT and had no issues.
Anyway, if you want to get the ISO then you’ll probably want something like Rufus to help you burn it into a USB thumb drive. As I mentioned above, during the course of about 15 installation attempts, I ended up recreating the bootable media with WMCT and that’s the version I ultimately successfully used. The other failures weren’t due to the ISO or Rufus, but it’s probably easier to just use WMCT unless you have some other burning reason not to.
Hard drive prep
I had already cleaned everything I needed off of the M.2 drive, and had reformatted it before leaving macOS. The drive doesn’t need to be in any particular state, format, or partitioning scheme - you can take care of that in the Windows installer.
Some motherboards have little quirks about whether you can actually have more than one M.2 drive connected, and if so, what other SATA ports you might lose access to, or which other PCIe slots get degraded lanes or just stop working altogether. In my case, I’d already connected it up correctly several years ago and didn’t need to make any changes, but worth checking if you’re using the M.2 drive for the first time.
BIOS prep
I’m going to skip all of the many, many things I tried that didn’t work with BIOS settings for this, and just make note of what I ended up finding was important. Obviously all BIOSs are different and so this won’t be an exact prescription unless you also happen to have a GIGABYTE GA-Z170X-UD5 on F21 BIOS version, but it may be helpful nonetheless.
CSM needs to be turned off. This is Compatibility Support Module, and it (possibly among other things) will force the boot media into MBR mode, and not UEFI mode. You want UEFI mode unless your motherboard is somehow so old that it’s not enabled. But if that were the case you’re probably not trying to install Windows 10 on it.
If you have CSM enabled, it’s very likely that you’ll see an error message like “Windows cannot be installed to this disk. The selected disk is of the GPT partition style.”
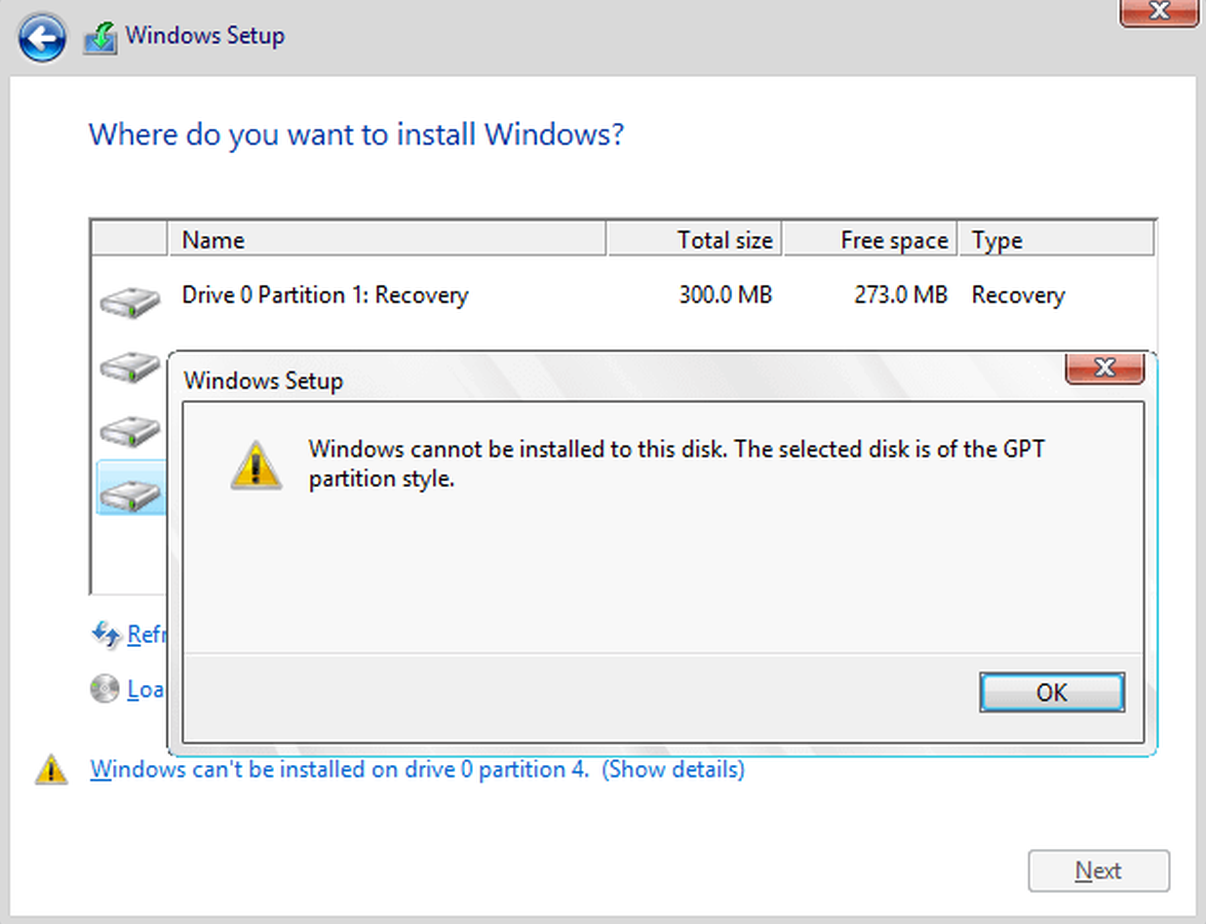
This may mean you have CSM enabled
I also needed to set Secure Boot to Disabled otherwise I couldn’t even get to the BIOS screen… I needed to hard-reset the CMOS a few times before I figured this out definitively.
The final setting that mattered was the “Windows 8/10 Features”, which needed to be set to “Windows 8/10”. The WHQL setting isn’t needed, and the “Other OS” had been my previous setting when the boot manager was Clover from the Hackintosh EFI partition, but didn’t work with a Windows EFI boot loader.
I also had “Fast Boot” turned off, but I don’t think it should matter either way. All these settings (in my BIOS) were under the tab labeled “BIOS”.
Windows 10 doesn’t like to install from USB to NVMe
I don’t know why this is a problem. Others seem to have it as well, but not consistently. I don’t know if it’s related to this being a clean install with multiple internal hard drives connected, or to something about USB 3.x vs USB 2.0 for the installer media, or maybe something entirely different. Either way, as I made it through the initial few steps of the Windows 10 installation, I kept running into a failure with the error message “Windows could not prepare the computer to boot into the next phase of installation. To install Windows, restart the installation.” Of course, restarting the installation doesn’t change anything.
Before getting to this point, I had used the partition manager in the installer to delete all partitions from the target NVMe drive, then chose the Unallocated Space on which to install Windows. I also tried creating the partitions manually myself, with the same error message.
After much swearing both at the installer and the garbage that is the Microsoft Community Forums, I finally found my way to a gentleman who went by RichardKay1 and seemed to have not only the same exact problem as I, but also a solution that looked like it might have merit.
His steps outlined on the forum were not exact, and mostly dealt with the diskpart utility, with which
I am not all that familiar, so I also spent some time trying to figure out how to safely use that tool
without deleting all the data on the 4 other disks that I had connected still.
Pro-tip: probably safer to disconnect all the other disks you’re not using for the actual install before messing around with
diskpart. Unless you’re very careful. Or brave/stupid. I decline to identify into which category I fell.
WARNING:
diskpartcan seriously ruin your day. BE CAREFUL BEFORE YOU HIT ENTER. You have been warned.
According to Mr. RichardKay1, the root cause is that the USB installer actually tries to install Windows onto the same USB stick, despite me having chosen an internal drive as the target. I don’t really know how to verify this, but regardless, his solution worked.
Move the installer to the internal disk first
This is the key takeaway to solve the “Windows could not prepare the computer to boot into the next phase of installation”. Or it was in my case, anyway.
Reformat the target drive
- Boot into the USB installer (I assume you can do this, else you probably the target audience.).
- Select the language, time, and keyboard type, click Next.
- Click “Repair your computer”, then “Troubleshoot”, then “Command Prompt”.
This puts you on the X: drive (temporary RAM disk with some command line utilities) and able to access the rest of the connected drives. First step is to fully erase the target disk.
NOTE: it’s up to you to choose the correct disks, and make sure that erasing them is actually what you want to do!
- From the command prompt, type
diskpartto start the utility. You’ll get a little prompt likeDISKPART>and not much else. - Type
list diskto show all disks, and identify (by size or whatever) which is your target.
DISKPART> list disk

  Disk ###  Status         Size     Free     Dyn  Gpt
  --------  -------------  -------  -------  ---  ---
  Disk 0    Online          111 GB      0 B
  Disk 1    Online          931 GB  1024 KB        *
  Disk 2    Online          465 GB  2048 KB        *
  Disk 3    Online          111 GB      0 B        *
  Disk 4    Online          111 GB      0 B        *
  Disk 5    No Media           0 B      0 B
  Disk 6    Online           14 GB      0 B

DISKPART>
My target in this case was a 500GB disk, so here shown as Disk 2 (it’s not exact).
- Type
select disk 2to choose this disk for manipulation.
WARNING: the next step will erase EVERYTHING on the disk you have selected!
- Type
cleanto erase all partitions on this disk. If you runlist diskagain after this you should see that the value in the “Free” column has gone up to the full drive capacity.
Prep the internal drive
- We eventually want to boot in UEFI mode, and so need the partition scheme to be GPT. Type
convert gptto accomplish this.
This is where I diverged a bit from the forum answer. I wanted to create a EFI partition manually so that
I could keep it big enough to later use grub for a dual-boot Linux install, and also to get the EFI partition
in the right spot on the disk so when I collapsed partitions later I wouldn’t leave a gap.
- Create an EFI partition with
create partition EFI size=500(size is in MB). - Format the EFI partition to FAT32 (important) with
format FS=FAT32 label=System.
Now that EFI was ready to go, I wanted to create a ~10GB partition to hold the install media that was currently on the USB thumb drive. The process is similar to creating the EFI partition except that it’s a ‘primary’ partition and formatted as NTFS:
- Create installer partition with
create partition primary size=10000. - Format installer partition with
format quick FS=NTFS label=Installer.
Next, I needed to access files on both the installer USB and also on the new internal partition. To do that I needed to assign a drive letter.
- To see what letters are assigned, type
list volume
DISKPART> list volume

  Volume ###  Ltr  Label        Fs     Type        Size     Status     Info
  ----------  ---  -----------  -----  ----------  -------  ---------  --------
  Volume 0     F   RedData      exFAT  Partition    111 GB  Healthy
  Volume 1     D                NTFS   Partition    930 GB  Healthy
  Volume 2                      NTFS   Partition    490 MB  Healthy
  Volume 3         EFI          FAT32  Partition    200 MB  Healthy    System
  Volume 4     C                NTFS   Partition    464 GB  Healthy    Boot
  Volume 5                      NTFS   Partition    499 MB  Healthy
  Volume 6         SYSTEM       FAT32  Partition    500 MB  Healthy    Hidden
  Volume 7         EFI          FAT32  Partition    200 MB  Healthy    Hidden
  Volume 8         Installer    NTFS   Partition      9 GB  Healthy
  Volume 9         EFI          FAT32  Partition    200 MB  Healthy    Hidden
  Volume 10    G                       Removable       0 B  No Media
  Volume 11    E   ESD-USB      FAT32  Removable     14 GB  Healthy
There’s a lot to look at, but you can see my ~10GB Installer volume, the 500MB EFI volume named SYSTEM
and also the USB thumb drive named ESD-USB, which already has a drive letter of E. If you’ve done any steps
out of order, you might want to check you’re on the right partition by typing list part, and checking
for the asterisk (*) to the left of the Installer partition.
- Assign a drive letter to the Installer partition, type
assign letter=Z. You can choose any unassigned letter.
Copy installer files to the internal drive
Now that you have a place for the files, you need to actually copy them. Quit diskpart by typing exit. This
will drop you back to the regular command prompt. Make sure you’ve noted down the drive letter for the
USB thumb drive as well. In this example it’s E.
- Copy all files from the USB thumbdrive to the new, internal, Installer partition. To do this, type
xcopy E:\*.* Z:\ /s. This assumesE:is the USB drive andZ:is the internal Installer partition.
The copy will take a few minutes. Go get a coffee, shrug the tension out of your shoulders, whatever.
Install from the internal drive instead
Once the xcopy command has finished, shutdown the computer, remove the USB drive, and reboot. Hit BIOS
so you can change the boot disk to the drive/partition you just created. I assume you’ll be able to figure
this part out on your own. If it doesn’t boot right, look back up at the BIOS settings and make sure you
have CSM and Secure Boot both disabled. If your BIOS has a “Windows 8/10” setting, make sure that’s correct
as well.
From this point forward, the rest of the installation is pretty straightforward. Once you get to the step where the Windows installer wants you to pick a target drive, just choose the Unallocated Space that’s left on the target drive (same drive as your new installer media).
Windows 10 should finish the installation successfully, but at the end you’ll still have an extra (and useless) Installation partition, as well as an extra EFI partition that you don’t really need. I used a partition utility called AOMEI Partition Assistant to get rid of these once the installation was complete. The free version did everything I needed it to. Since I had manually created an EFI partition at the start, I could delete the installer-created EFI and the Installer partition, and then merge the primary partition (where Windows is actually installed) with the new free space. I’m sure there’s a way to do all this without AOEMI, but I couldn’t figure it out. Windows partition manager doesn’t like extending/ expanding/merging volumes if the free space is “to the left”. AOEMI (I think) accomplishes this by just copying all the data over. Probably best to do this step ASAP after the install before you start filling your drive up.
Bonus: Windows decrapifier
Since you’ve got a shiny new copy of Windows 10 now, why not keep it a bit cleaner by removing all the extra garbage that’s thrown into the standard install. Here’s a script and a nice writeup about how to use it that will help automate some of it. Like any other script you find on the internet, you should probably read through it and have an idea of what it’s doing before you just blindly follow my (or their) advice.
As with the partition moving, this is best done immediately at the start of a fresh install - you’ll lose some user data by following the instructions and running the script, so don’t get too carried away before you give it a run.
Note: some links may be affiliate links, from which I may earn a small commission if you purchase anything after clicking through. There is no change to the price that you pay for anything you buy, and it’s slightly motivational to me to see referral income like this.