Installing Matrix Synapse on Digital Ocean
Installing Matrix Synapse on a Digital Ocean droplet
Why do I want to do this?
That’s a good question. I think the honest answer is because I had some spare time this week and I wanted to learn something new. Part of me also says that after having left at least 5 different primary messaging platforms over the last 20 years due to them either being killed off (looking at you, Google), or becoming irrelevant (ICQ anyone?), or becoming too creepy (WhatsApp, WeChat), it might be worth investing in a chat platform that’s under (mostly) my own control.
I’ve seen bits and pieces about Matrix over the last couple of years, but never really investigated it much. I knew that it was open source and self-hosted, but what I didn’t know until yesterday is that it also has quite a few bridges to connect to the chat apps I still do use. Most of my day-to-day chatting right now is via Telegram, which has been working out pretty well for the last two years, but I’m not convinced how much longer a Russian tech billionaire is going to want to keep self-funding the project, especially after the TON ICO was halted by the SEC.
Anyway, if nothing else I’d learn a bit about the Matrix community, keep current on some sysadmin skills, and build a little more feeling of ownership in the parts of the internet that I use on a daily basis. If I found a lot of value in Matrix after it was up and running, maybe I’d try to get some of my normal contacts to add/switch, or if not than I should be able to set up some bridging and still talk via my usual platforms, but with my own copy of the chats on my private server, and the knowledge that I’d marginally improved my online privacy.
Before going too much further, I read the How can I get involved? page on the Matrix website, and spent a bit of time testing out the Element client in both the web and the desktop (Windows) app forms. Satisfied that it all seemed usable enough that I could get used to it for a daily driver, I started investigating what it takes to self-host a Synapse server.
Domain name setup on Namecheap
First thing I need is a domain name to point at my new chat server. I already own several domain names (OK, domain collecting
is actually something of a bad habit of mine), but since the domain name of the server is reflected in one’s Matrix
ID, I wanted to stick with ansonvandoren.com, to mirror both this website, and my email addresses. To complicate this just a bit,
I didn’t want to use the same VPS that hosts my blog, and I also wanted Synapse to actually listen on a subdomain,
(e.g., matrix.ansonvandoren.com) instead of the domain name itself. Neither of these criteria makes the setup unmanageable,
but each adds a bit of complexity that I’ll describe below.
My domain name is registered through NameCheap, which has been an absolute pleasure to work
with over the last few years. Since the nameservers for ansonvandoren.com already point towards DigitalOcean, I don’t
need to make any changes there. (Note: I may gain a small commission from Namecheap if you use the link above. You will
not be charged anything extra for using it. Thanks!)
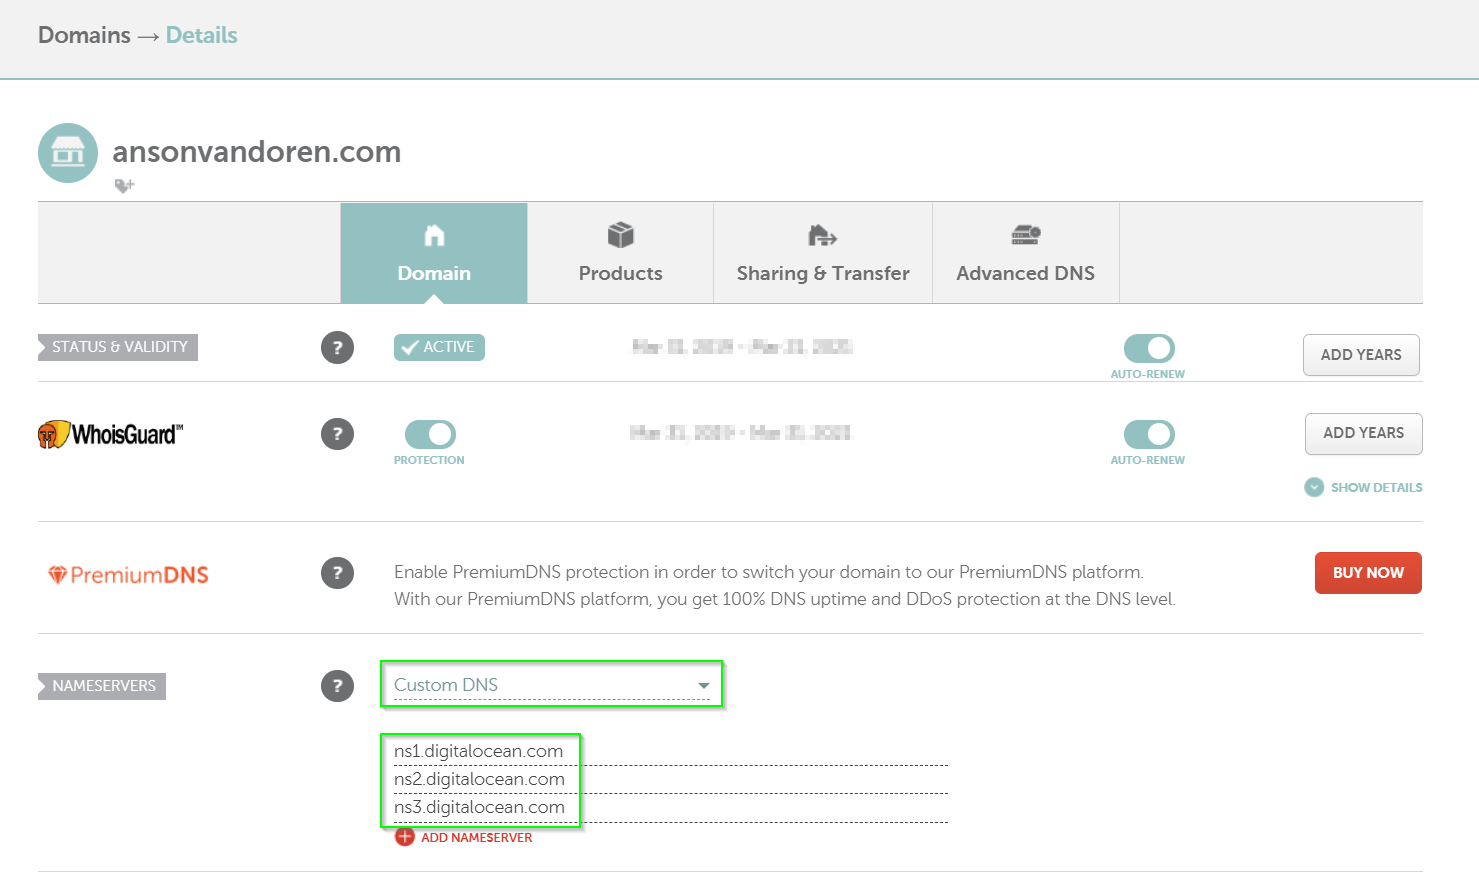
If you’re starting out from scratch and do need to point a Namecheap domain at a Digital Ocean droplet, you’ll want the “Custom DNS” setting, and the nameservers shown below:
Droplet creation on Digital Ocean
I’ve been using Digital Ocean for hosting for years now and love their services. The price is right for the hobby projects I usually take on, and the setup and maintenance is easy. If you’re interested, here’s a referral link you can use to sign up. I’ll get a small commission if you sign up and keep using them, but it doesn’t cost you anything.
Based on the Synapse installation guide, the minimum
system requirements are 1GB of RAM. As you’ll see later, it’s fairly easy to limit the memory used even further if you
don’t have many users on your homeserver. I chose an Ubuntu 20.04, Basic/Shared CPU $5/mo droplet with 1GB RAM, 1 (shared) CPU,
25GB storage, and 1000GB/mo bandwidth. Since I live in California, I chose a San Francisco datacenter. I selected IPv6 and Monitoring
options, and re-used my existing SSH keys from previous droplets. I chose a hostname of matrix and some relevant tags,
assigned it to my personal project, and enabled backups.
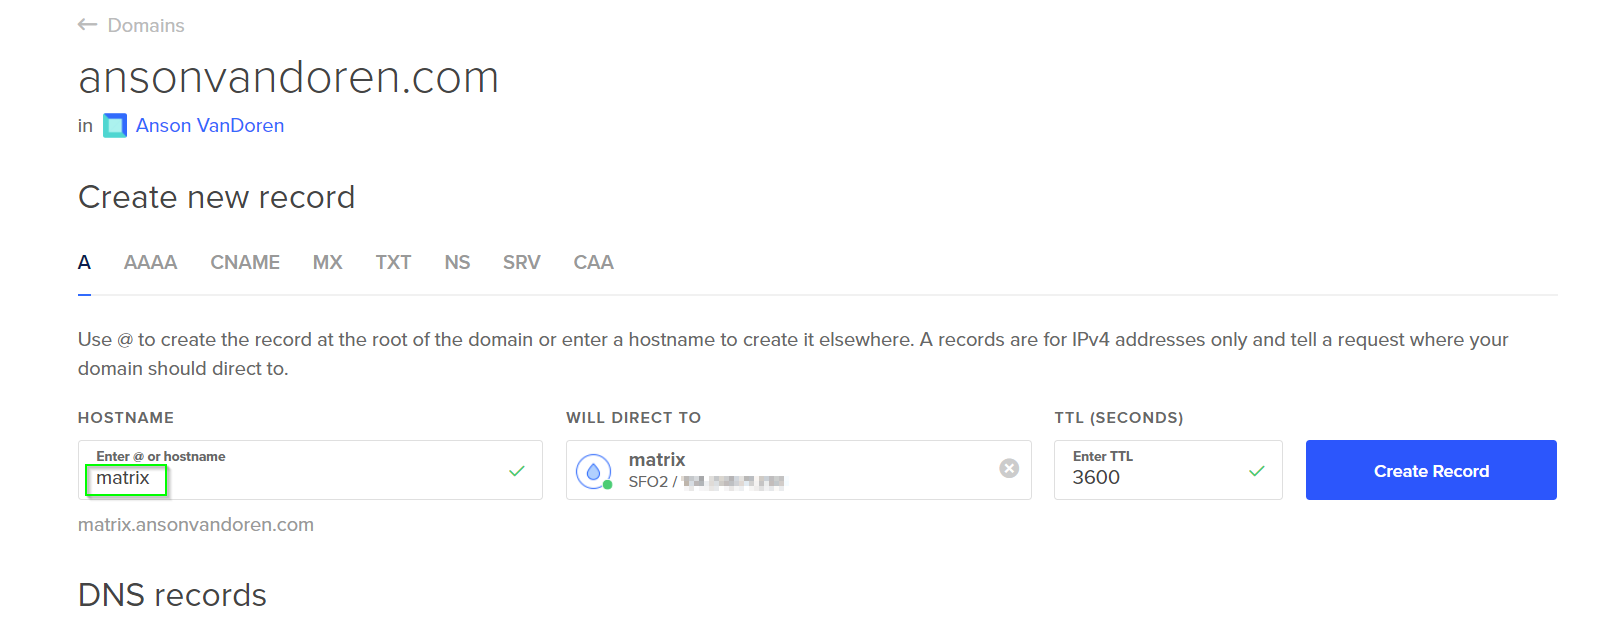
It takes a few moments to spin up. Before connecting the first time, I set up a subdomain record through DigitalOcean
(under the Networking menu) that points matrix.ansonvandoren.com to the newly created droplet. I did this for both an
A record and an AAA record (IPv4 and IPv6).
Since I chose to use a SSH key to login, I didn’t need the Access Console at all, and instead just connected from a terminal session using:
$ ssh root@matrix.ansonvandoren.com
It takes some time for the new DNS records to propagate, so if you get an error message like this, then try using the IP address instead, or just wait an hour or so.
ssh: Could not resolve hostname matrix.ansonvandoren.com: No address associated with hostname
Initial droplet setup
Following the Initial Server Setup with Ubuntu 20.04 documentation from Digital Ocean, I created a new non-root user, generated a memorable and secure password using Correct Horse Battery Staple, and saved the new credentials in 1Password.
I finished out the guide by:
- Copying the SSH authorized_keys over to the new user
- Making the new user a superuser
- Setting up
ufwfirewall rules (allowingOpenSSH,http,https) - Updating Linux packages
Installing Synapse
I followed these instructions from the Matrix Github page, installing the prebuilt packages for Ubuntu:
$ sudo apt install -y lsb-release wget apt-transport-https
$ sudo wget -O /usr/share/keyrings/matrix-org-archive-keyring.gpg https://packages.matrix.org/debian/matrix-org-archive-keyring.gpg
$ echo "deb [signed-by=/usr/share/keyrings/matrix-org-archive-keyring.gpg] https://packages.matrix.org/debian/ $(lsb_release -cs) main" |
    sudo tee /etc/apt/sources.list.d/matrix-org.list
$ sudo apt update
$ sudo apt install matrix-synapse-py3
During the installation, when prompted for the Synapse server name, I used ansonvandoren.com even though the Synapse
server is actually pointed to by matrix.ansonvandoren.com since I intend to set up delegation later. Your
needs may be different, so you may want to read the delegation docs
to help you decide. By choosing ansonvandoren.com as the server name and then delegating it, I can keep logical
servers with different names to improve organization and security, but still keep my Matrix ID as something
like @anson:ansonvandoren.com instead of @anson:matrix.ansonvandoren.com.
Installing PostgreSQL for Synapse
This isn’t required, and probably not actually needed since I don’t plan to host a lot of users, but it seemed easier to do it now rather than try to do it down the road. There is a migration path from SQLite to PostgreSQL, but it looks a little error-prone, and also, according to the official docs:
Almost all installations should opt to use PostgreSQL
Installation instructions are linked from the main Synapse install page, but those assume you already have Postgres installed, which I did not on the new droplet. There is a pretty good tutorial on Digital Ocean for setting up Postgres that I referenced to get started.
Install PostgreSQL:
$ sudo apt install postgresql postgresql-contrib
Switch to the newly created postgres user:
$ sudo -u postgres bash
Create a synapse_user Postgres role:
$ createuser --pwprompt synapse_user
Enter a new password (and don’t forget to store it in 1Password).
Create the Synapse database by first starting psql
$ psql
psql (12.5 (Ubuntu 12.5-0ubuntu0.20.04.1))
Type "help" for help.
then from the Postgres prompt, create the database:
postgres=# CREATE DATABASE synapse
             ENCODING 'UTF8'
             LC_COLLATE='C'
             LC_CTYPE='C'
             template=template0
             OWNER synapse_user;
Exit the Postgres prompt by typing \q, and then exit back into the normal user login.
To set Synapse to use Postgres instead of the default SQLite, edit the config file:
$ sudo vim /etc/matrix-synapse/homeserver.yaml
Search for the database section, and comment out the sqlite3 section, and uncomment the psycopg2 part.
Mine looks like this:
database:
  name: psycopg2
  args:
    user: synapse_user
    password: secretpassword
    database: synapse
    host: localhost
    cp_min: 5
    cp_max: 10
Obviously, change secretpassword to whatever your synapse_user password is (created a few steps above).
Configuring reverse proxy for Synapse
Again, the Matrix team has a reasonable set of instructions here. I chose to use Caddy for a reverse proxy, mostly because I already use Nginx for other projects, and wanted some different experience. I followed the basic Caddy 2 installation instructions from here.
$ sudo apt install -y debian-keyring debian-archive-keyring apt-transport-https
$ curl -1sLf 'https://dl.cloudsmith.io/public/caddy/stable/cfg/gpg/gpg.155B6D79CA56EA34.key' | sudo apt-key add -
$ curl -1sLf 'https://dl.cloudsmith.io/public/caddy/stable/cfg/setup/config.deb.txt?distro=debian&version=any-version' | sudo tee -a /etc/apt/sources.list.d/caddy-stable.list
$ sudo apt update
$ sudo apt install caddy
There is a default Caddyfile in /etc/caddy/Caddyfile that I edited to look like below:
matrix.ansonvandoren.com {
  # enable logging
  log

  reverse_proxy /_matrix/* http://localhost:8008
  reverse_proxy /_synapse/client/* http://localhost:8008
}
From that folder, reload caddy with
$ sudo caddy reload
Then wait for LetsEncrypt to generate the certs. Make sure that http and https are enabled via ufw.
Delegating access to a subdomain
Since the Synapse server is hosted on a different box and a subdomain (not just ansonvandoren.com),
I needed to delegate access. The easiest way seems to be with a .well-known directive, so I followed the
basic instructions here. Sort of.
Actually I needed quite a bit from this document as well.
On my regular ansonvandoren.com host, in the same Nginx server block that holds information
for this website, I added the following:
server {
    server_name ansonvandoren.com;

    # ... other config ... #

    # matrix delegation
    location /.well-known/matrix {
        proxy_pass https://matrix.ansonvandoren.com/.well-known/matrix;
        proxy_set_header X-Forwarded-For $remote_addr;
        proxy_ssl_server_name on;  # this is important!
    }

    # ... other config ... #
}
I don’t fully understand the proxy_ssl_server_name on; directive, but it took me over an hour
to figure out that this is why I was running into issues.
Originally I kept getting 502 errors if I tried connecting to https://ansonvandoren.com/.well-known/matrix/server
instead of https://matrix.ansonvandoren.com/.well-known/matrix/server.
In the ansonvandoren.com droplet Nginx logs, I had various errors such as “no live upstreams while
connecting to upstream” and “SSL_do_handshake() failed while SSL handshaking to upstream”.
As best I can tell, it is somehow related to ansonvandoren.com having its own TLS certs, and reverse proxying
traffic to matrix.ansonvandoren.com which has a separate cert. I don’t think it was related to the fact
that one was Nginx and one was Caddy, but like I said, I’m still not 100% sure.
Unrelated, but a cool find as I was researching this problem, is a nifty Nginx configuration file generator that Digital Ocean offers on their website.
To actually give the correct delegation response, I simply added a few lines to the Caddyfile on matrix.ansonvandoren.com:
matrix.ansonvandoren.com {
  # enable logging
  log

  # .well-known is delegated from ansonvandoren.com and served here
  header /.well-known/matrix/server {
    Content-Type application/json
  }
  respond /.well-known/matrix/server 200 {
    body "{ \"m.server\": \"matrix.ansonvandoren.com:443\" }"
    close
  }
  # .well-known delegate for client
  header /.well-known/matrix/client {
    Content-Type application/json
  }
  respond /.well-known/matrix/client 200 {
    body "{\"m.homeserver\": {\"base_url\": \"https://matrix.ansonvandoren.com\"}}"
    close
  }

  reverse_proxy /_matrix/* http://localhost:8008
  reverse_proxy /_synapse/client/* http://localhost:8008
}}
Hat tip to Fusehunt for this article that showed how to return a JSON response directly from the Caddyfile.
Don’t forget to sudo caddy reload after making and saving the changes.
Cleaning up and testing federation
At this point I was several hours into the project, but nearing the home stretch. Synapse is known to be… somewhat generous… with its memory usage, and since I’m on a droplet with only 1GB available, I wanted to set a limit for this server. I may run a self-hosted Riot instance later on, and want to keep it on the same box without having resource allocation problems. This is as simple as a one-line change:
Edit /etc/default/matrix-synapse:
SYNAPSE_CACHE_FACTOR 0.02
This will limit RAM usage to ~512MB. Don’t forget to sudo systemctl restart matrix-synapse after
you’re done with any configuration changes.
You can test that federation is set up correctly either from here
or from here (after replacing
DOMAIN in the address with your actual Matrix domain).
User creation and testing a Matrix client
For the time being, I will be the only user on this homeserver. Eventually I will probably add some others, but for now manual user creation through the command line isn’t terribly burdensome.
Before you can register a new user, you need to generate a shared registration secret. To get started, generate a random string however you like. Here’s two possible ways:
$ uuidgen
d944dc9b-fbc2-4b8f-a47e-d16a63ce550b
or
$ cat /dev/urandom | tr -dc 'a-zA-Z0-9' | fold -w 32 | head -n 1
VizdGWt7hbbaOrjhi1SQssPvHGsUKCTC
Now, edit /etc/matrix-synapse/homeserver.yaml and look for the registration_shared_secret key.
Paste the shared secret here between quotes, after uncommenting the line.
Now restart synapse:
$ sudo systemctl restart matrix-synapse
Then run the following and step through the options to create a new user:
$ register_new_matrix_user -c /etc/matrix-synapse/homeserver.yaml http://localhost:8008
You’ll be prompted for username, new password (don’t forget to store it safely), and whether or not the new user should be an admin (probably yes).
At this point you should be able to download a Matrix client like Element (or
use their hosted webapp), and enter your new credentials, possibly under an “Other” tab when choosing
the server. For the address field, I used ansonvandoren.com (which delegates to the actual Synapse
server running on the subdomain). Then to complete the login I used anson (the username I created
just above) and its accompanying new password.
Adding a Telegram bot/bridge/relay
After getting the basic Matrix server and client up and running, I looked into bridging Matrix
to my Telegram account, so I could seamlessly chat to the groups I’m already a part of there. Based on the
Matrix Bridges page, I chose mautrix-telegram for this purpose. The
installation instructions are fairly
comprehensive, and there’s not much more to add to them here, other than to note (since I missed it
the first time through) that you’ll need to install some dependencies via apt if you want to use the
optional features of the Python library. Specifically, I had to:
$ sudo apt-get update; sudo apt-get install --no-install-recommends libwebp libolm-dev python3-dev build-essential
and then proceed with the “Production setup” instructions. Once the bridge is up and running
in a tmux session (so it stays running in the background even when I logout of the SSH session),
I followed along with the Authentication
instructions, which were all straightforward and quick to accomplish.
So far, I don’t see a way to backfill my conversation history after the bridge was established, but I think there should be a method for that which I’ll find eventually, if I keep using Matrix.
Worth it?
I’m not sure yet if I’ll keep using Matrix - it’s only been one day so far. What I do like is that it bridges easily, not just to Telegram but also to a few dozen other platforms. If I used other chat apps regularly, Matrix has the potential to bring them together into a single app. I really like the fact that I don’t have to worry about whether someone else will shut down, or start charging for, or want too much personal data in exchange for my use of their app. If Telegram shut down tomorrow, for instance, I’d have a chat history still, and I could just try to get my friends and family to move over to my own Matrix server.
The overall setup process wasn’t bad, but I wouldn’t classify it as anything close to beginner friendly. The Matrix team believes that their instructions are perfectly adequate, and doesn’t seem inclined to polish them up or fill in any of the missing gaps. I was not able to successfully install for my particular use case without resorting to quite a bit of Googling and reading other people’s articles. In terms of ease of use, there’s still something to be desired here.
The other communities fully on Matrix seem pretty vibrant, and many of the open source projects that I follow, use, and contribute to have their own Matrix or Matrix-compatible chatrooms. This makes discovery useful for me in particular, but I am also pretty close to the target audience here, so for others who aren’t quite as tech-nerd-heavy as I am it may be more difficult to find new communities.
I’ll keep using Matrix for now, and will update this article if I run across any deal-breakers or new killer features that I think appreciably change my opinion.