Captive Web Portal for ESP8266 with MicroPython - Part 1
Project idea
I’ve worked on a few small projects recently using an ESP8266 SoC, and one thing that sort of bothered me is that I needed to hard-code my home WiFi access point SSID and password into either the Python file or a separate config file. It’s not really that big of a deal for small personal projects, but when I buy “smart” gadgets from anywhere else, they always come with the option to set up the device by connecting to a temporary WiFi access point on the device itself, and then typing my home WiFi SSID and password into a HTML form.
This aim of this project is to program the ESP8266 MCU to:
- On startup, first check if it already knows how to log into my home WiFi. Once I set up a device, I’d expect it to remember the WiFi credentials I told it even if it was rebooted.
- If it doesn’t have any known credentials, or the previously saved credentials don’t work, then start an unsecured WiFi access point on bootup instead.
- With my phone, connect to the MCU WiFi AP, and then enter the SSID and password for my actual home WiFI.
- The MCU then tries to connect to my home WiFi using the newly provided credentials, and display a basic status page showing what network it connected to, and what is its IP address on my home network.
This idea isn’t really new, and it’s referred to as a “captive portal” in other contexts. It’s something you may have seen when logging into public WiFi at your favorite coffee shop, where you’re redirected to a sign-in page before being allowed online. There’s a few different ways to accomplish that, but the way I’m going to do it will require a HTTP server (to serve some HTML to ask for WiFi SSID and password), and also a DNS server to redirect all DNS questions to the IP address of the MCU so that I don’t need to know the board’s IP address. I’ll be able to just connect to the board’s access point, and then navigate to any (non-HTTPS) website, and it will redirect me to the login page I want.
The non-HTTPS part is important; for the sake of simplicity, the HTTP server is only listening on port 80, and not 443. HTTPS requests will still get redirected to the board, but there isn’t a HTTPS socket listening for them there, so they’ll time out. It’s possible to add HTTPS redirection like this, but there’s a few problems:
- Many browsers will display an warning, or refuse to show the page, if a HTTPS site is redirected. This is obviously good for security, but makes it a pain for this particular use-case.
- I would need to set up SSL certificates, start a third socket server on the MCU, and be able to handle TLS/SSL connections, which is more involved than plain HTTP. I think the ESP8266 is probably capable of this, but it’s a tiny device with limited resources available, and this would be way overkill for what I actually need.
For my Android phone (and I think for iOS devices as well), the OS detects that it doesn’t have internet access and will automatically ask me to sign in anyway, which goes over HTTP and does the redirection I need. If this doesn’t work, I could just intentionally navigate to a site that I know uses HTTP only (like http://example.com or http://neverssl.com) to trigger the redirection.
Basic hardware setup
I wrote a previous article on setting up a NodeMCU ESP8266 with MicroPython a few months ago, so instead of repeating all the instructions here you can check out that article instead. I’ll assume that you can already rshell into your MCU for the rest of this post.
The only difference from last time is that I’m using a different board this time, a Wemos D1 Mini I ordered from Amazon. It has the same ESP8266 chipset and mostly the same features, but fewer GPIO pins than the other one. The price is about the same either way, but I was looking for a smaller form factor for my next project, and this is about half the size of the NodeMCU development board.
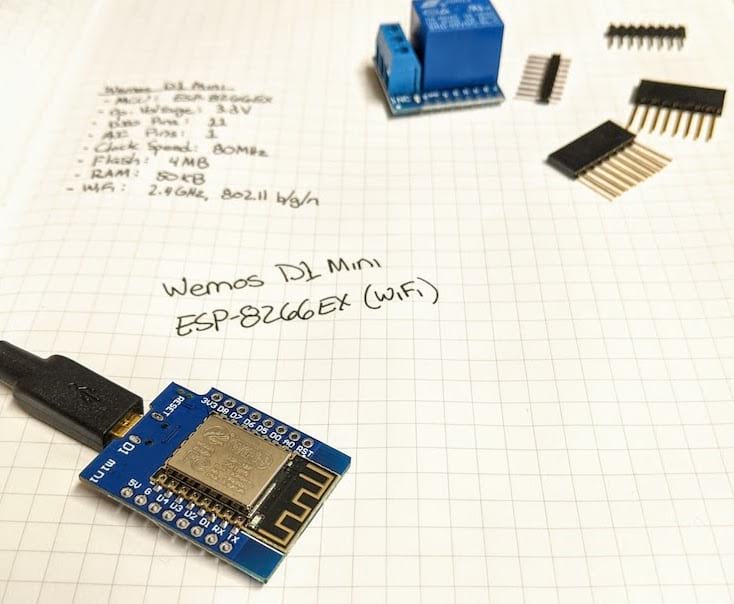
Wemos D1 Mini (ESP-8266EX chipset
The one additional step I did need to get the D1 Mini to work was to install an additional driver. All of my search results for this ended up with kind of sketchy-looking websites, but I think the “official” driver from the manufacturer should be safe. The link above is for the macOS version of the driver, but there’s also drivers for Windows and Linux on the same site.
Aside from this, everything was basically the same except that the Wemos D1 Mini shows up on a different serial port, in my case /dev/cu.wchusbserial1430. As a reminder, you can check this yourself using the esptool.py tool from Espressif:
$ esptool.py read_mac
esptool.py v2.8
Found 3 serial ports
Serial port /dev/cu.wchusbserial1430
Connecting....
Detecting chip type... ESP8266
Chip is ESP8266EX
Features: WiFi
Crystal is 26MHz
MAC: 2c:f4:32:78:d0:c1
Uploading stub...
Running stub...
Stub running...
MAC: 2c:f4:32:78:d0:c1
Hard resetting via RTS pin...
ESP8266 filesystem
Connecting to the board with rshell after initially flashing the latest MicroPython binary from here (I used v1.12) shows a single file (boot.py) in the /pyboard folder.
I didn’t touch the boot.py file, and mine looked like this:
# /pyboard/boot.py
# This file is executed on every boot (including wake-boot from deepsleep)
#import esp
#esp.osdebug(None)
import uos, machine
#uos.dupterm(None, 1) # disable REPL on UART(0)
import gc
#import webrepl
#webrepl.start()
gc.collect()
The boot.py file is the first file run each time the board resets. It’s not doing much in my case other than a garbage collection, but I’ll leave it as is.
The other file that’s run on each boot is called main.py, but it doesn’t exist yet. Since this project is intended to just be the bootstrap code for a new device, I don’t want to clutter up main.py with the captive portal code. I’ll write most of this code in separate files, and just import and call it from a couple of lines in main.py.
One other important fact I learned on this project is that since MicroPython needs to import and “compile” (into frozen bytecode) each file in one chunk, the raw Python file sizes need to be limited to what’s available in RAM on the MCU, minus what the interpreter is using up. In practice, I found this meant that I couldn’t import a source file much larger than ~8Kb. In some cases (for this and other projects in MicroPython), I’ve needed to run garbage collection between imports as well. The documentation talks a bit about it if you want more details. If you get (cryptic, seemingly incomplete) errors like the example below, it may mean your file size is too large, and you should break it up into multiple files:
>>> import captive_http
Traceback (most recent call last):
  File "<stdin>", line 1, in <module>
MemoryError:

>>>
Getting started
It’s possible to use rshell to edit files directly (sort of) on the MCU, but I prefer to edit from my host machine and then copy the files in from there during testing. This way I keep the latest updates inside my git repo on my desktop and never need to worry about which is the latest version. My workflow looks something like this:
- Edit files (e.g., main.py) on my host PC
rshellto MCU, thencp main.py /pyboard/- On the MCU, start the
repland thenimport main
To start this project off, I’m going to create two files:
main.py, which will kick off the code I want to run and otherwise be available for future project code.captive_portal.py,which will coordinate the HTTP and DNS servers to make this WiFi bootstrapping code work.
I’ll start with main.py since it’s only a couple of lines:
# main.py
from captive_portal import CaptivePortal

portal = CaptivePortal()

portal.start()
As you can see, not much going on here other than importing my CaptivePortal class and running its start() function. I’ll write that class and method in a new file like this:
# captive_portal.py
import network
import uerrno
import uos as os
import utime as time

class CaptivePortal:
    CRED_FILE = "./wifi.creds"
    MAX_CONN_ATTEMPTS = 10

    def __init__(self):
        self.sta_if = network.WLAN(network.STA_IF)

        self.ssid = None
        self.password = None

    def start(self):
        # turn off station interface to force a reconnect
        self.sta_if.active(False)
        if not self.try_connect_from_file():
            self.captive_portal()

    def connect_to_wifi(self):
        print(
            "Trying to connect to SSID '{:s}' with password {:s}".format(
                self.ssid, self.password
            )
        )
        # initiate the connection
        self.sta_if.active(True)
        self.sta_if.connect(self.ssid, self.password)

        attempts = 0
        while attempts < self.MAX_CONN_ATTEMPTS:
            if not self.sta_if.isconnected():
                print("Connection in progress")
                time.sleep(2)
                attempts += 1
            else:
                print("Connected to {:s}".format(self.ssid))
                self.local_ip = self.sta_if.ifconfig()[0]
                self.write_creds(self.ssid, self.password)
                return True

        print("Failed to connect to {:s} with {:s}. WLAN status={:d}".format(
            self.ssid, self.password, self.sta_if.status()
        ))
        # forget the credentials since they didn't work, and turn off station mode
        self.ssid = self.password = None
        self.sta_if.active(False)
        return False

    def write_creds(self, ssid, password):
        open(self.CRED_FILE, 'wb').write(b','.join([ssid, password]))
        print("Wrote credentials to {:s}".format(self.CRED_FILE))

    def captive_portal(self):
        print("Starting captive portal")

    def try_connect_from_file(self):
        print("Trying to load WiFi credentials from {:s}".format(self.CRED_FILE))
        try:
            os.stat(self.CRED_FILE)
        except OSError as e:
            if e.args[0] == uerrno.ENOENT:
                print("{:s} does not exist".format(self.CRED_FILE))
                return False

        contents = open(self.CRED_FILE, 'rb').read().split(b',')
        if len(contents) == 2:
            self.ssid, self.password = contents
        else:
            print("Invalid credentials file:", contents)
            return False

        if not self.connect_to_wifi():
            print("Connect with saved credentials failed, starting captive portal")
            os.remove(self.CRED_FILE)
            return False

        return True
There’s a few things that may look strange here if you’re coming from CPython (“normal” Python) and haven’t used MicroPython before. MicroPython is fairly full-featured, but it is still only a subset of CPython, and as such some of the standard library is missing. In most of these cases, I’m importing the “micro” version of the library instead (like uos instead of os). The PyCopy docs are really excellent when trying to figure out similarities and differences between the two Python versions and has been a huge help throughout this project.
Note: PyCopy is a fork of MicroPython, but the documentation is much better written and more complete. Generally they are feature equivalent, so I tend to use the docs from PyCopy instead.
The class __init__() method sets up variables for eventual SSID and password, and also a reference to the MCU’s station interface. The station interface is for the MCU to connect to another WiFi hotspot. Later on, we’ll also configure the MCU’s access point interface.
For now, the start() method is just trying to connect to my home WiFi point from previously-saved credentials if it can, and if not, it will (eventually) start the captive portal itself.
The try_connect_from_file() method is fairly straightforward:
- Check if the file exists where we expect WiFi credentials
- If it does, open it and check that it has two comma separated values
- If it does, try to connect with those values assuming the first is my home WiFi SSID, and the second is the WiFi password
- If any step fails, return
Falseso that we can start up the captive portal instead to prompt the user to enter these credentials.
connect_to_wifi() turns on the station interface and tries to connect with the credentials we have (which don’t exist yet, since we didn’t read them from the file and haven’t prompted the user). It waits up to 20 seconds for the connection to be established before bailing out. If it fails to connect, it will print the interface status, which will be one of the constants listed in the MicroPython network documentation.
Copy both of these files into the /pyboard/ folder on the MCU, then run repl and import main:
/pyboard> repl
Entering REPL. Use Control-X to exit.
>
MicroPython v1.12 on 2019-12-20; ESP module with ESP8266
Type "help()" for more information.
>>>
>>> import main
Trying to load WiFi credentials from ./wifi.creds
./wifi.creds does not exist
Starting captive portal
Base server class
Since I’ll need both a DNS and HTTP server, it makes sense to extract out any common parts into a superclass. The basic functionality of this class will be to create a socket on a specified port and then register it with a stream poller that will notify the server when a new event occurs on the socket. MicroPython has the uselect module to help deal with streams like this, which is a subset of CPython select module. Using this poller, we can run both the HTTP and DNS servers at the same time without either one blocking waiting to listen to its socket.
Here’s the Server class I created in a new file:
# server.py
import usocket as socket
import uselect as select


class Server:
    def __init__(self, poller, port, sock_type, name):
        self.name = name
        # create socket with correct type: stream (TCP) or datagram (UDP)
        self.sock = socket.socket(socket.AF_INET, sock_type)

        # register to get event updates for this socket
        self.poller = poller
        self.poller.register(self.sock, select.POLLIN)

        addr = socket.getaddrinfo("0.0.0.0", port)[0][-1]
        # allow new requests while still sending last response
        self.sock.setsockopt(socket.SOL_SOCKET, socket.SO_REUSEADDR, 1)
        self.sock.bind(addr)

        print(self.name, "listening on", addr)

    def stop(self, poller):
        poller.unregister(self.sock)
        self.sock.close()
        print(self.name, "stopped")
The HTTP server will use a TCP socket on port 80, while the DNS server will use a UDP socket on port 53. Once the socket is created, I’ll register it with a poller passed in from the caller (so I can reuse the same poller) and sign up for the POLLIN event, which will notify whenever the socket has new incoming data to read. Even though I didn’t register for them in the event bitmask, I’ll also potentially get POLLHUP (hangup) and POLLERR (error) events.
Next I set the socket options to reuse its address. This is mostly only important for the TCP socket since there may still be outgoing data for a recently-closed socket while I want to send new data out on a new connection. For a better in-depth discussion on the SO_REUSEADDR flag, here’s a great StackOverflow answer.
Finally, I bind the new socket to the shortcut address “0.0.0.0” which will listen for all IPv4 addresses on the MCU and the given port. The MicroPython documentation for usocket is helpful in getting this setup correctly.
Other than the constructor, the only method I pulled up into this superclass is one to gracefully halt the server when I’m done by unregistering it from the poller and closing the socket.
DNS server class
Now that I have the skeleton in place, I’ll create a DNS server subclass in a new file called captive_dns.py:
# captive_dns.py
import usocket as socket
import gc

from server import Server

class DNSServer(Server):
    def __init__(self, poller, ip_addr):
        super().__init__(poller, 53, socket.SOCK_DGRAM, "DNS Server")
        self.ip_addr = ip_addr

    def handle(self, sock, event, others):
        # server doesn't spawn other sockets, so only respond to its own socket
        if sock is not self.sock:
            return

        # check the DNS question, and respond with an answer
        try:
            data, sender = sock.recvfrom(1024)
            print("Got data:", data, "from sender:", sender)
        except Exception as e:
            print("DNS server exception:", e)
This DNS server doesn’t really do much yet. Whenever its handle() method is called with a socket, event type, and possibly additional data, it will check to make sure the socket is what it expects, and then try to read in 1024 bytes of data from the socket. Obviously we’ll add more here soon, but this should be enough to test the basic functionality.
Setting up the access point
Now, back in the CaptivePortal class, I’ll instantiate a DNS server and set up an event poller loop to start listening to the socket stream. Before we can do that, though, I need to set up the MCU to turn on its access point interface so it can accept incoming WiFi connections:
# captive_portal.py
import network
import ubinascii as binascii
...

class CaptivePortal:
    AP_IP = "192.168.4.1"
    CRED_FILE = "./wifi.creds"
    MAX_CONN_ATTEMPTS = 10

    def __init__(self, essid=None):
        self.local_ip = self.AP_IP
        self.sta_if = network.WLAN(network.STA_IF)
        self.ap_if = network.WLAN(network.AP_IF)

        if essid is None:
            essid = b"ESP8266-%s" % binascii.hexlify(self.ap_if.config("mac")[-3:])
        self.essid = essid

        self.ssid = None
        self.password = None
    ...
Here, I’m setting up a local IP address that I’ll use for the access point (which happens to be the default ESP8266 address, but doesn’t need to be), and then getting access to the Access Point interface. I also added a constructor parameter for the access point SSID in case I wanted to name it differently. If I don’t pass in a special name, it will use part of the MCU’s MAC address to create a unique SSID for the access point.
Next, I’ll create a method to actually turn on and configure the access point interface, and then call that at the start of the captive_portal() method:
# captive_portal.py
...
class CaptivePortal:
    ...
    def start_access_point(self):
        # sometimes need to turn off AP before it will come up properly
        self.ap_if.active(False)
        while not self.ap_if.active():
            print("Waiting for access point to turn on")
            self.ap_if.active(True)
            time.sleep(1)
        # IP address, netmask, gateway, DNS
        self.ap_if.ifconfig(
            (self.local_ip, "255.255.255.0", self.local_ip, self.local_ip)
        )
        self.ap_if.config(essid=self.essid, authmode=network.AUTH_OPEN)
        print("AP mode configured:", self.ap_if.ifconfig())

    def captive_portal(self):
        print("Starting captive portal")
        self.start_access_point()
    ...
I ran into issues occasionally where if the AP interface was already turned on when I tried to reconfigure it, it would throw an error or else just never configure itself properly. To get around that, I explicitly restart it every time I want it on, and wait for it to report it’s active before proceeding.
The ifconfig() function call sets (in order):
- IP address
- Netmask
- Gateway
- DNS server
The values I’m using for IP address, netmask, and gateway are all the default for the interface, but I’m changing the DNS server to point to the MCU itself, instead of a “real” DNS service so that we can have the MCU respond to all DNS queries for devices that connect to it in order to redirect them how we want.
Lastly, I set the network SSID (the name I’ll see when I try to connect from my phone), and set it to an open access point so I don’t need to enter a password to connect. Then it’s just a matter of calling this function at the beginning of my captive_portal() method to kick things off.
To test everything out so far, I copied my new/changed files onto the MCU and then imported main from the REPL:
MicroPython v1.12 on 2019-12-20; ESP module with ESP8266
Type "help()" for more information.
>>>
>>> import main
Trying to load WiFi credentials from ./wifi.creds
./wifi.creds does not exist
Starting captive portal
Waiting for access point to turn on
#33 ets_task(4020f510, 29, 3fff8f88, 10)
#34 ets_task(4020f510, 29, 3fff8f88, 10)
AP mode configured: ('192.168.4.1', '255.255.255.0', '192.168.4.1', '192.168.4.1')
Looks good here. On my phone, I searched for available WiFi access points, and there it is!
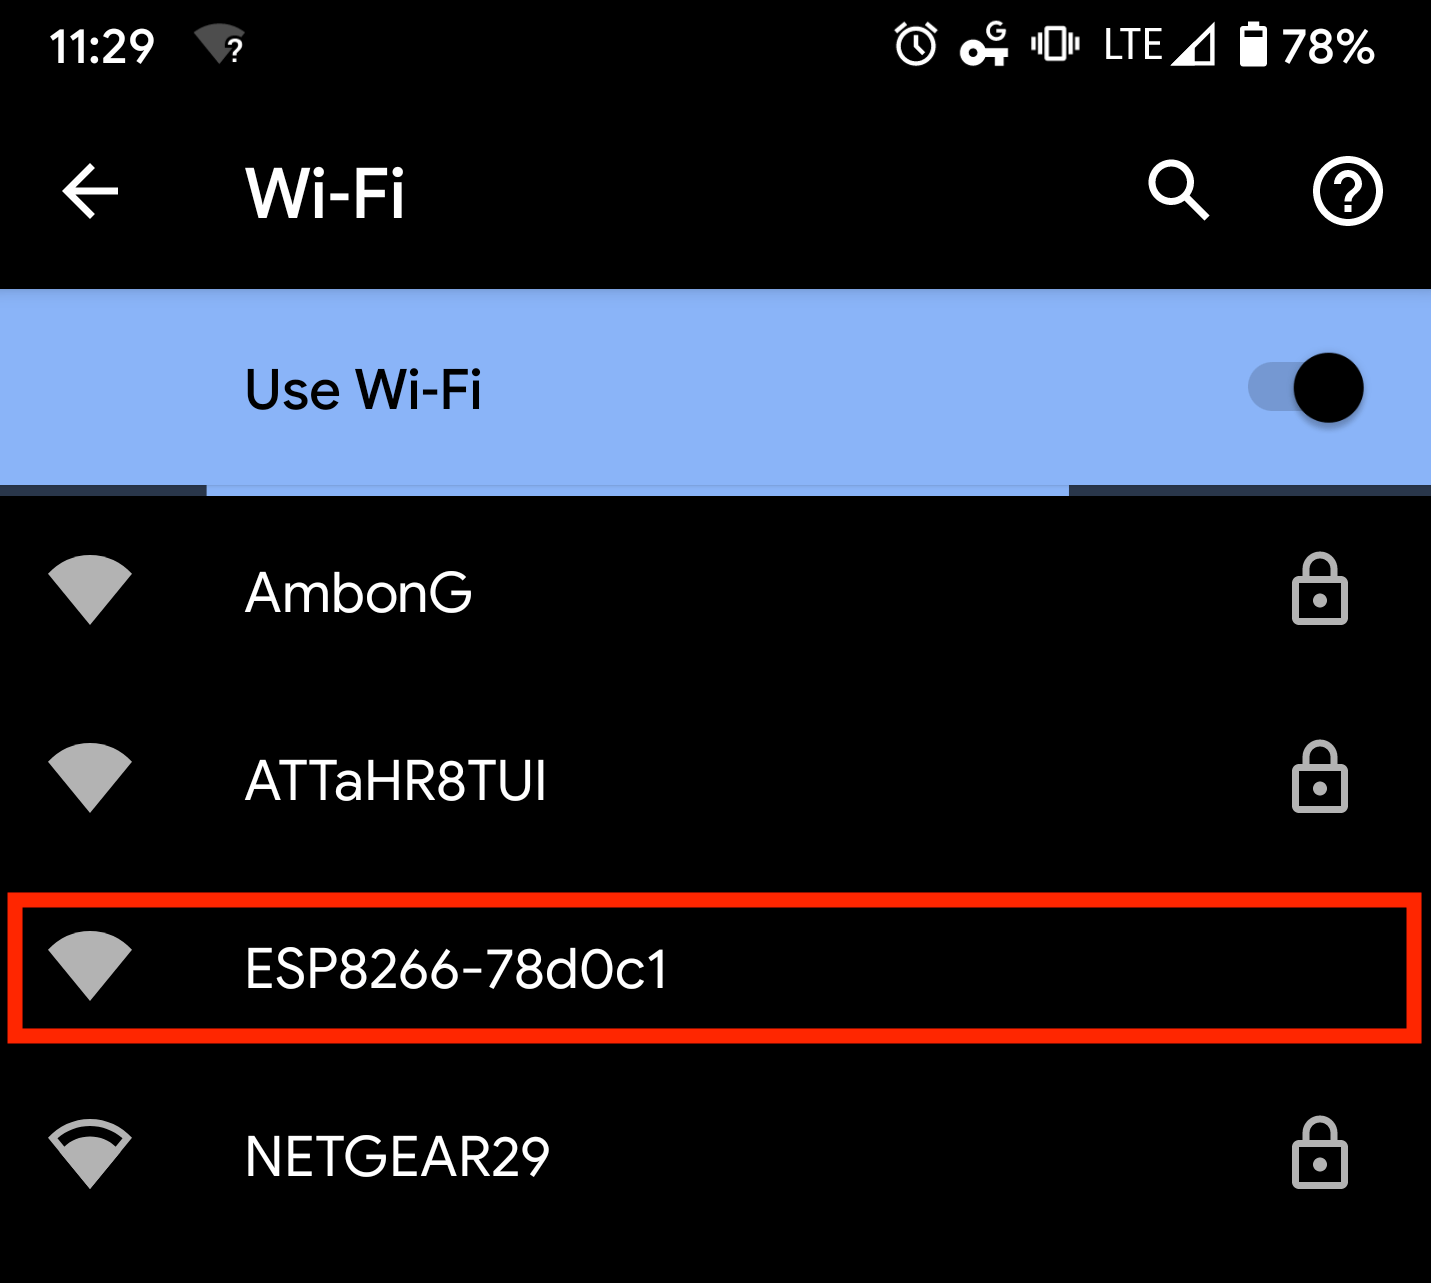
ESP8266 WiFi Access Point
Polling for socket events
Now that I have an access point that my phone can connect to, it’s time to start actually polling with the DNS server. Remember that the access point configuration is telling all its client that it is the DNS server, so when my phone connects and tries to look up a domain name, it will be asking the MCU itself what IP address that URL points to.
Make the following additions to the CaptivePortal class:
# captive_portal.py
...
import gc
import uselect as select

from captive_dns import DNSServer

class CaptivePortal:
    AP_IP = "192.168.4.1"
    CRED_FILE = "./wifi.creds"
    MAX_CONN_ATTEMPTS = 10

    def __init__(self, essid=None):
        ...
        self.dns_server = None
        self.poller = select.poll()
        ...

    def captive_portal(self):
        print("Starting captive portal")
        self.start_access_point()

        if self.dns_server is None:
            self.dns_server = DNSServer(self.poller, self.local_ip)
            print("Configured DNS server")

        try:
            while True:
                gc.collect()
                # check for socket events and handle them
                for response in self.poller.ipoll(1000):
                    sock, event, *others = response
                    self.handle_dns(sock, event, others)
        except KeyboardInterrupt:
            print("Captive portal stopped")
        self.cleanup()

    def handle_dns(self, sock, event, others):
        if sock is self.dns_server.sock:
            # ignore UDP socket hangups
            if event == select.POLLHUP:
                return True
            self.dns_server.handle(sock, event, others)
            return True
        return False

    def cleanup(self):
        print("Cleaning up")
        if self.dns_server:
            self.dns_server.stop(self.poller)
        gc.collect()
    ...
Here I’m using the uselect module to create a Poll object. When I instantiate the DNSServer class, it registers its socket with the poller, and any events on that socket stream will show up as a response that I can iterate through. I’m calling the ipoll method with a timeout of 1000msec, and if there’s any event, I check whether the DNSServer wants to handle it.
Since UDP is a connectionless protocol (and possibly due to a bug in the ESP8266 port of MicroPython), I found I was getting dozens of POLLHUP (stream hang-up) events per second after the first, which are useless to me in this application. I ignore those for now, and otherwise send the event to the DNSServer to handle itself.
To test it all out, I saved, copied, and ran from REPL again. After I connected my phone to the access point, I can see some DNS requests coming in. After confirming it worked, I used Ctrl-C to exit, and verified the cleanup code was also called.
MicroPython v1.12 on 2019-12-20; ESP module with ESP8266
Type "help()" for more information.
>>>
>>> import main
Trying to load WiFi credentials from ./wifi.creds
./wifi.creds does not exist
Starting captive portal
Waiting for access point to turn on
#50 ets_task(4020f510, 29, 3fff9428, 10)
AP mode configured: ('192.168.4.1', '255.255.255.0', '192.168.4.1', '192.168.4.1')
DNS Server listening on ('0.0.0.0', 53)
Configured DNS server
Got data: b'\xa7A\x01\x00\x00\x01\x00\x00\x00\x00\x00\x00\x03www\x06google\x03com
\x00\x00\x01\x00\x01' from sender: ('192.168.4.2', 42434)
Got data: b'Eo\x01\x00\x00\x01\x00\x00\x00\x00\x00\x00\x11connectivitycheck\x07gs
tatic\x03com\x00\x00\x01\x00\x01' from sender: ('192.168.4.2', 13197)
Got data: b'\xa7A\x01\x00\x00\x01\x00\x00\x00\x00\x00\x00\x03www\x06google\x03com
\x00\x00\x01\x00\x01' from sender: ('192.168.4.2', 42434)
Got data: b'Eo\x01\x00\x00\x01\x00\x00\x00\x00\x00\x00\x11connectivitycheck\x07gs
tatic\x03com\x00\x00\x01\x00\x01' from sender: ('192.168.4.2', 13197)
Captive portal stopped
Cleaning up
DNS Server stopped
Recap
So far, I’ve accomplished the following:
- Configured the Wemos D1 Mini MCU with MicroPython firmware and established a serial connection.
- Made the MCU try to connect to an already-known WiFi point if it has one, on bootup.
- Written a base server class that can bind to a socket and register to receive events on that socket stream.
- Written the skeleton of a DNS server that listens to UDP datagrams on port 53 and displays them on screen.
- Set up the basic event loop of the captive server to poll for events and handle them appropriately.
In the next part, I’ll tackle how to understand DNS questions and generate an answer that will point all DNS queries back to the MCU’s IP address so that the user will always be presented with a login page when they connect to the MCU’s WiFi access point.
Next: Captive Web Portal for ESP8266 with MicroPython - Part 2
Code: GitHub project repo
Found a problem with this post? Submit a PR to fix it here: GitHub website repo
Note: if you buy a product from Amazon using any of the links in this post, I may be rewarded with a small commission.